Tuesday, April 10, 2012


Plastic Spoon Lamp

If you are the type of person that only eats off of plastic spoons or just someone that has access to a lot of plastic spoons, you might like this project. 


Materials - Clean, plastic 2 liter bottle, exact-o-knife, lots of plastic spoons, hot glue gun, wire cutters and lamp kit.

Step 1 - Gather your spoons and a large plastic bottle. You will need about 200 plastic spoons and one 2 liter bottle. If you ate off of the spoons, wash them.

Step 2 - Cut the handle of the spoons off so you only have the bowl and a small (about a cm) part of the handle.
Step 3 - Using an exact-o-knife, cut the bottom of the bottle off. Leave a small bit of the bottom for a nicer look

Step 4 - Starting at the bottom of the bottle, glue on the spoon bowls side to side. Do this until you make it the entire way around. Then, glue on the next level in the spaces between the first layer. Continue doing this layer after layer until you get to the top.


Step 5 - Now, drop you lamp kit through the top, attach to top of bottle and screw in your lightbulb. Make sure you keep the bottle from touching the bulb, otherwise, it will melt quickly. After this, you are done!

***NOTE***
Depending on which type of bulb you use, you will get a different effect. I used a energy efficient compact fluorescent light bulb. This shows the 'grains' in the spoons which I really like. However, if you use an incandescent light bulb, it will have more of a draping effect and looks very nice.


Monday, April 9, 2012


Glass Bottle Candles


Materials - Wine bottle, glass cutter, candle, sandpaper, base (if cut is very even), tea candle.

Step 1 - Cut the wine bottle in half using a method of scoring, using a candle to heat the score, then using cold water to thermally shock the glass into completing a (somewhat) nice cut.


Step 2 - Sand the top part of the bottle down by placing the rough end on the sandpaper and turning in small circles. It doesn't need to be the smoothest thing on earth, but it needs to smooth enough to not cut you.


Step 3 - If there aren't any chips on the bottom that could let air in, you might need to build a base. You could do this by bending a small amount of wire into a circle (for the candle) and four lines to balance the glass.


Step 4 - Insert a tea light in the center and light it. Now you have yourself, a candle that adds ambiance to any room.


Sunday, April 8, 2012

Plastic Bottle Terrarium


Plastic Bottle Terrarium 

I remember making one of these in 8th grade and thought it was fun. It is an environmentally friendly way to recycle your plastic bottles and grow plants. 


Materials - Bottle (plastic), thick rope (I used fabric), scissors, soil, and a seed. 

Step 1 - Cut the bottle in half.


Step 2 - Wash out the halves. 

Step 3 - Drill/poke a hole in the cap. This is where the string will go. 

Step 4 - Insert a thick string into the hole. Make sure it is a very snug fit and will not come out. Leave a couple of inches to dangle in the water.


Step 5 - Fill the top with soil and the bottom with water. Plant your seed and leave it in a spot where the sun will shine. Give it a while and your plant will sprout and start growing. Enjoy!


Sunday, March 18, 2012

Aluminum Can 'Penny Stove'


Aluminum Can Stove
One of the things that I love about my school is our outdoor education program. Every year, we go on at least two outdoor trips where we carry all of our supplies and clothes. This craft is for those who love camping and want a new stove without having to buy one. 


Materials - Two aluminum cans, sharpie, measuring tape, thumbtack, rubber band, box cutter and/or scissors, alcohol fuel and penny.

Step 1 - Find two aluminum cans you want to use. Could be beer cans or could be soda cans. Since I’m under 21, I’m using soda cans. 

Step 2 - Using a sharpie or other marker between a book, mark a line ⅞ths of and inch of the way up from the bottom of one can. This can will be on the inside of the stove. Whichever can you want to show on the outside, you need to mark a line 1⅜ inches up.


Step 3 - Using the sharpie, mark a dot on the bottom of can on. Mark another dot across from it. Split the dots on either side with two more dots. Split these dots with four more dots. Mark another eight dots and after that, another 16. 


Step 4 - Using a thumbtack, puncture the holes. I found the best way to do this was using my thumb to push after I had lined the thumbtack up with the mark.


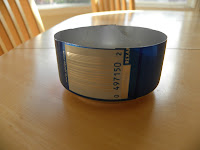
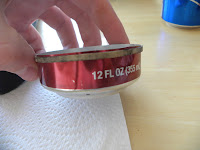
Step 5 - Now, cut the cans at their marks. The easiest way to do this was to wrap a rubber band around the mark and keep a consistent line of rubber where you want to cut. From there, I used a box-cutter to cut above the needed line and finished the cutting with scissors.


Step 6 - Using the rest of one of the cans, cut out a 1 ½” by 7” rectangle. This will make up the important interior of the can. Now, curl the rectangle into a circle that’s edges fit inside the small groove at the bottom of the 1 ⅜” can. 

Step 7 - Fit the strip by cutting two slits on opposite side of the strip about halfway down. Slide the ends together.
Step 8 - Cut three small ‘v’s into the bottom side of the inner circle that you just built. 
Step 9 - Place the inner circle inside the bottom, and slide the top into the bottom. This is the hardest part. 
Step 10 - Your stove in now complete.  To operate, pour alcohol fuel through the center holes.  Light the center holes and place penny over holes.  This will cause fuel to vaporize and flames to appear through holes on the edges.

Friday, February 24, 2012

Aluminum Can Artwork


 This project is mainly for the artsy type. You can make many things out using the various colors of aluminum cans. 


Materials - Depending on what you want to make, you will need: A few aluminum cans, scissors, a creative mind, a backing of some kind.

Step 1 - Pick your cans. If you want to do something colorful, you will need different brands of cans. My suggestions for colors are as follows: Red - Coca Cola or Dr Pepper, Blue - Pepsi, Green - Mountain Dew, Yellow - Squirt or Mellow Yellow. You can use other ones, but those are what I would use.

Step 2 - Cut both the top and bottom off. The top and bottom portions are the parts that are sloped. Essentially, cut off everything but the section of the can that has the logo. 

Step 3 - Cut these up into small pieces. My recommendation for a smaller, more intricate piece would be in square centimeters, or if you want to do a big piece, using square inches.

Step 4 - Chose your design and/or pattern and think of how you should layout your pieces.  


Step 5 - Glue down each piece where you want it to be. I advise going section by section instead of row by row. Try leaving a small space in between each piece, like you’re laying tile.

Step 6 - Continue following your design until finished. If you want, paint a glossy vinyl over it for protection. Now you have your own, unique piece of art!


Recycling! Yay!