Aluminum Can Stove
One of the things that I love about my school is our outdoor education program. Every year, we go on at least two outdoor trips where we carry all of our supplies and clothes. This craft is for those who love camping and want a new stove without having to buy one.
Materials - Two aluminum cans, sharpie, measuring tape, thumbtack, rubber band, box cutter and/or scissors, alcohol fuel and penny.
Materials - Two aluminum cans, sharpie, measuring tape, thumbtack, rubber band, box cutter and/or scissors, alcohol fuel and penny.
Step 1 - Find two aluminum cans you want to use. Could be beer cans or could be soda cans. Since I’m under 21, I’m using soda cans.


Step 5 - Now, cut the cans at their marks. The easiest way to do this was to wrap a rubber band around the mark and keep a consistent line of rubber where you want to cut. From there, I used a box-cutter to cut above the needed line and finished the cutting with scissors.


Step 2 - Using a sharpie or other marker between a book, mark a line ⅞ths of and inch of the way up from the bottom of one can. This can will be on the inside of the stove. Whichever can you want to show on the outside, you need to mark a line 1⅜ inches up.


Step 3 - Using the sharpie, mark a dot on the bottom of can on. Mark another dot across from it. Split the dots on either side with two more dots. Split these dots with four more dots. Mark another eight dots and after that, another 16.


Step 4 - Using a thumbtack, puncture the holes. I found the best way to do this was using my thumb to push after I had lined the thumbtack up with the mark.


Step 5 - Now, cut the cans at their marks. The easiest way to do this was to wrap a rubber band around the mark and keep a consistent line of rubber where you want to cut. From there, I used a box-cutter to cut above the needed line and finished the cutting with scissors.


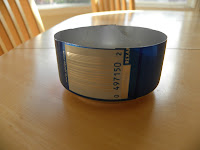
Step 6 - Using the rest of one of the cans, cut out a 1 ½” by 7” rectangle. This will make up the important interior of the can. Now, curl the rectangle into a circle that’s edges fit inside the small groove at the bottom of the 1 ⅜” can.


Step 7 - Fit the strip by cutting two slits on opposite side of the strip about halfway down. Slide the ends together.

Step 8 - Cut three small ‘v’s into the bottom side of the inner circle that you just built.

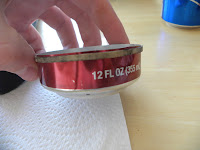
Step 9 - Place the inner circle inside the bottom, and slide the top into the bottom. This is the hardest part.

Step 10 - Your stove in now complete. To operate, pour alcohol fuel through the center holes. Light the center holes and place penny over holes. This will cause fuel to vaporize and flames to appear through holes on the edges.
No comments:
Post a Comment